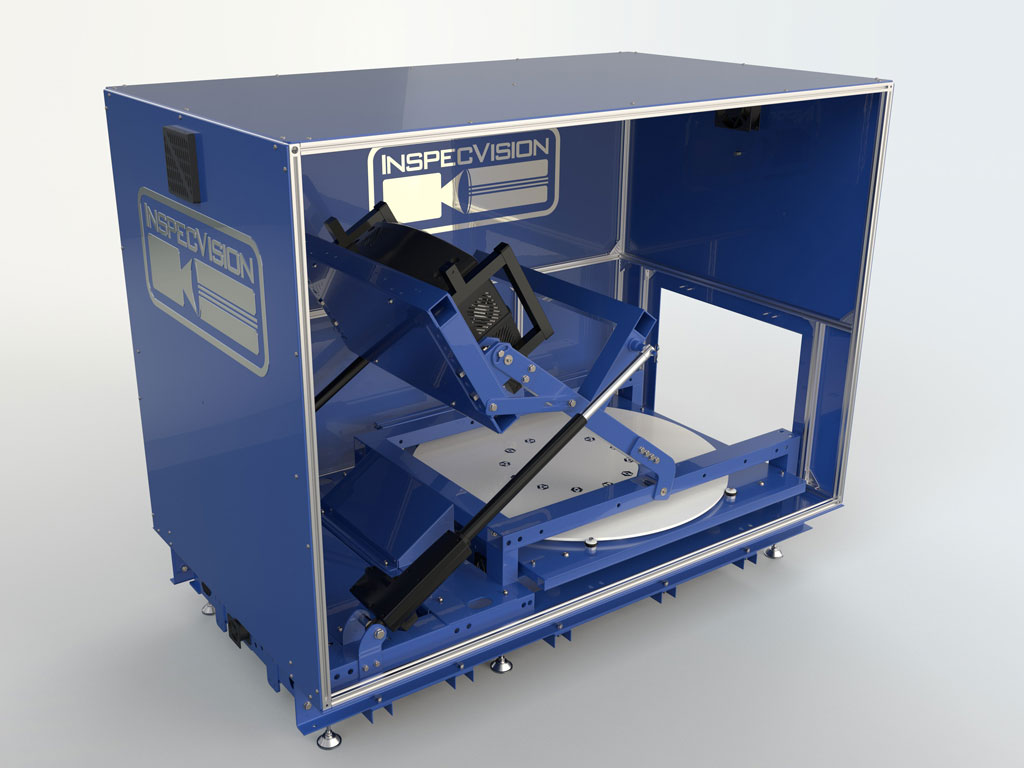
Opti-Scan OS350.10

Opti-Scan OS350.10
cechy produktu
- Measures surfaces and edges in 3D
- Single click automated inspection
- White light scanning technology
- Certified accuracy
- 20MP camera as standard
- Designed for factory floor conditions
Pictured: OS350.10 LEAA
Specyfikacja produktu
Dokładność:
Repeatability: 10 μm
Volumetric: 15 μm
Rezolucja
Field of View: 350mm
Camera: >20MP
Projector: >2MP
- Overview / Specifications
- Brochure
- Video
Overview / Specifications
| Description | Specification/Scope of Supply |
|---|---|
| Max Single scan area 1 & 2 | 350mm (X) x 215mm (Y) |
| Max Single scan depth* 1,2 & 3 | 215mm (Z) |
| Volumetric accuracy** | 15 microns |
| Repeatability** | 10 microns |
| Point Spacing | Better than 75 microns |
| Scanning speed*** | > 250,000 points per second |
| Scanning time*** | < 10 seconds |
| Processing time**** | < 5 seconds |
| Peripheral equipment | Table lighting controller, Standard Computer Interface |
| Required Operating System | Windows 10 64bit |
| Software included | 3D scanning, automated repositioning, texture map acquisition, 3D color rendering, creation of cross-sections, creation of 3D edges, reverse engineering of 3D edges to DXF/DWG, comparison of 3D edges to DXF/DWG, reverse projection of colored deviation reports onto part, creation of 3D point clouds in PLY, STL, VRML, ASCII formats, creation of texture mapped point clouds, calibration software. |
| Free 3D Inspection Software | Fully compatible with off the shelf free 3D inspection software. Functionality includes comparison to 3D solid models, dimensioning, GD&T, cross-sections, full surface deviation inspection, merging of scans, customizable reports, automatic alignment of scan to CAD, point cloud meshing, processing and filtering, extraction of nominal data from CAD model, comparison of 2 scans. |
| Advanced 3D inspection software option (Geomagic Control) | Available on request. Comparison to 3D solid models, GD&T, SPC, cross-sections, full surface and edge inspection, creation of report templates, automated merging of point clouds, automatic alignment of scan to CAD, automatic point cloud processing and filtering, automatic detection or repositioning spheres, macro creation for full automation, automatic extraction of nominal data from CAD model, comparison of 2 scans. |
| 3D reverse engineering (advanced package) | Available on request. Creation of 3D solid models from scan data. |
| Calibration Kit | Included as standard, retro-reflective reference markers mounted onto steel plate with repositioning frame |
| Accuracy Verification Object | Included as standard, calibrated hardened steel ball bar |
| OptiScan construction | Camera and projector assemblies mounted in a internal aluminium subframe, housed in a integral moulded enclosure made from ABS (Carbon fibre effect). |
| OptiScan enclosure | Welded steel base frame complete with pivoting sub frame, enclosed edge lit lighting table, Motorised rotational disc mounted on high load Xirodur polymer bearings and linear actuators for vertical tiling motion. Complete machine enclosed in removable canopy, constructed of aluminium with acrylic outer panels. |
| Automated turn-table maximum load (UDL) | 20kg |
| Camera | >20 megapixels |
| Projection source | Full HD 1080p 1920x1080 native resolution LED projector |
| Data cables | HDMI and USB3 |
| Power supply | 110-240V 50/60Hz |
| Power consumption | 2 Amp maximum at 230 Volt, 4 Amp max at 110 Volt |
| EC directives | Compliant with Machinery, Low voltage and EMC Directives |
| Paint color | Frame and Outer canopy: RAL5013 Blue |
| Ambient operating conditions | 5-35 degree C |
| Available configurations | L = Light Table, E = Enclosure, A = Automatic Repositioning disc, M = Manual Repositioning disc, AA = Automatic repositioning disc & tilt mechanism |
| Approx Footprint width/ depth/ height/ weight (OS350.10 Scanning Head Only) | (455 x 305 x 224mm) – 12KG |
| Approx Footprint width/ depth/ height/ weight (OS350.10 - Standalone Tripod Option) | (829 x 729 x 1323mm) < 25KG |
| Approx Footprint width/ depth/ height/ weight (OS350.10 LEAA) | (1474 x 885 x 1207mm) < 250 KG |
| Standard packing | Export crate suitable for sea shipping |
| Warranty | One year limited warranty on hardware and software |
| Optional extended warranty | Two or three year extended warranty (requires software upgrade option) |
| Software support option | Annual support contract provides free software upgrades |
- Larger parts can be measured with multiple scans
- Other sizes are available on request, exact dimensions may vary by slightly depending on setup.
- Other accuracies are available on request
*Actual scanning range will be significantly larger, however measurements outside of this range may have additional noise.
**Accuracy achieved by measuring a reference object at various locations within the measuring volume, contact InspecVision for further details.
***Time taken to measure a typical component. Results may vary depending on part measured or speed of computer****Time taken to process the measurements of a typical component.
Results may vary depending on part measured or speed of the computer.
Actual measuring accuracies achieved will depend on operating environment, user input, quality and condition of materials.
Due to our policy of continuous improvement specifications are subject to change without notice, please contact the factory or your InspecVision dealer.
Non-standard hardware, software or acceptance tests must be defined prior to purchase
Brochure
Video
Especialistas en el diseño y fabricación de sistemas de medida basados en visión artificial para aplicaciones industriales
Reserve una demostración de producto en línea de cualquiera o todos nuestros sistemas
